
Build your own Magrav
Instructions for the Magravs-Power Universal System. The purpose of these instructions is to assist those that want to build their own home plasma conditioning system.
 Device explained
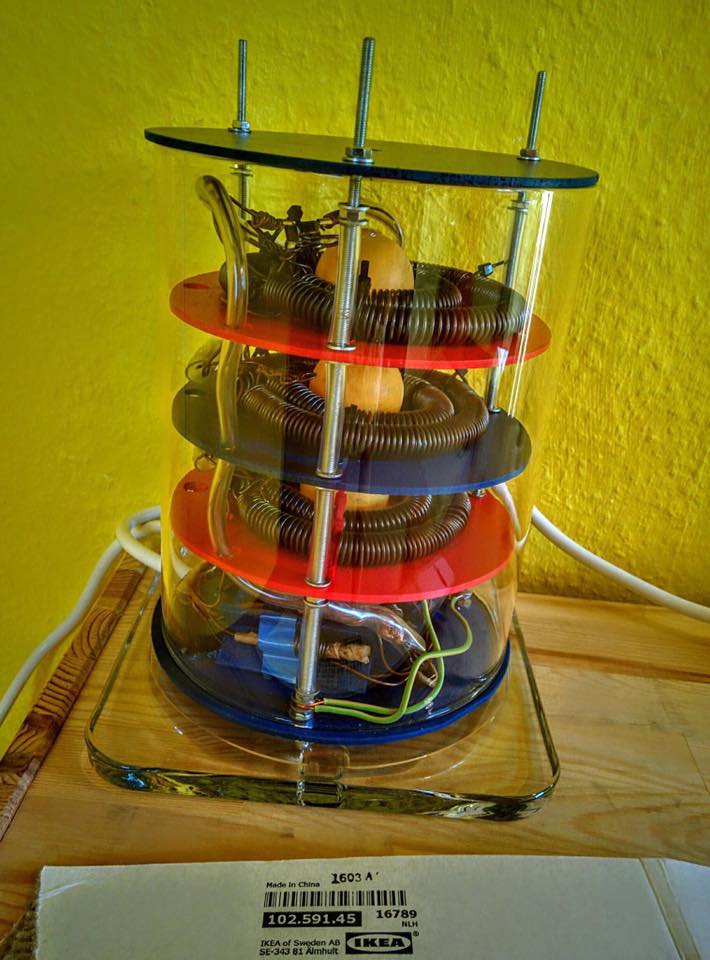
The magravs-power plasma conditioner uses a 3 stack Tesla Coil configuration. The coils are prepared and set up to produce plasma energy. The device feeds the plasma into your home electric grid. The plasma needs a path to travel on and starts nano coating your wire system. Your Magrav acts as a tool, a tool used to Nano Coats your home grid system with a layer of Carbon (Graphene). The graphene absorbs surrounding plasma energy, effectively mimicking electricity. You home wires become insulated in graphene enabling your wire system to sustain itself. More plasma energy helps you use less electricity from the grid. Savings on grid consumption is noted on your monthly expenses.
The Magravs Universal System effectively drops grid consumption. The response varies due to environmental conditions and household behaviour. Two Magravs Universal Systems connected together has shown to effectively lower electrical consumption by 75%. Further developments are made regularly and it is advised to follow the information channels mentioned on our resources page under teachings.
Some of the recent advances include a static off-grid plasma generator producing on average 5 Kw. We will update this page when we have more information on the off grid generator.
Terminology
Gans – Gas at a Nano State.
Water of Gans – Water that has been exposed to Gans. “Plasma activated water”.
Washed Gans – After you have made Gans, the material rests at the bottom of your container. It is extracted from the bottom with a syringe and put into another container. Clean water is added and mixed with the Gans. Let the Gans settle to the bottom, discard the excess water. Repeat the process 5 – 10 times to remove the salt content from the Gans.
Nano coat – There are two methods of Nano coating copper. You could either burn the copper wire with a blowtorch or you could use caustic soda steam process. When you Nano coat material you change the surface to allow plasma to effectively travel on its surface. Nano coated material is used in Gans production. Ultimately it is up to the individual to choose the coating process. Some use both processes to Nano coat. More information coming on Nano coating methods.
Material Needed
Caustic Soda – 1kg (Local chemical store) *More caustic might be needed if you choose to nano coat your coils with the caustic process.
- 1x Big Syringe
- 1x Tube that fits over the syringe tap
- 1x 6 mm rod 80 cm long
- 1x 10 mm rod 80 cm long
- 3x Ping-Pong Balls (Usually comes in packs of 6) 40mm diameter
- 1x Safety glasses
- 1x Gloves
- Plastic containers 4 +
Copper Wire
These are the measurements used in South Africa and it is the easiest to find these. There are other options on the market, but these cable options come with insulation and have to be stripped.
1.6/1.7 mm copper cable single strand (50m) – Coils, Wires, Capacitors Outer Coil
1.5 mm2 – 7 strand copper cable (1m) – Capacitors Inner Rod
Note: South Africa works on square mm. Ask at your local electricity store for more details. It is recommended to not use more than 2.5 mm thick cable. It is up to the user to decide which size wire to work with. Also remember that you might have to adjust the rod sizes to cater for different wire sizes. Your rod size difference should be equal to your wire thickness (linear measurement) multiplied by 2 + 0.5mm for the gap. This is to allow it to slide in easily but still be compact.
Metals
In South Africa it is very hard to find pure zinc plates. We stock Zinc Rods in our Store but corrugated products such as the zinc plates used in construction can be used as an alternative. The Zinc will simply run off while you produce your Gans, after which it is discarded. Pipes and brackets could be used for the copper and steel. Best to look around the house or neighbourhood. There is always the odd old copper pipe or metal pieces such as zinc plates and steel. Try and save as much as possible.
Note: When making Gans with corrugated zinc you should monitor the process to ensure that only CO2 Gans is made. Its advised to let some white Gans form and then to stop the process when the metal becomes too exposed. If the colour of the Gans change you are tapping into the metal inside the corrugated zinc which will give you a different metallic oxide combination Gans. For plasma health applications its recommended to use pure zinc. Plasma Tools
4x Copper Plates/Pipes
1x Zinc Plate/Off cut *Note: Old Batteries have Zinc in. Old Duracell Batteries have zinc and carbon rods. Cut the top off, drain and use pure zinc.
1x Iron Plate/Bracket
Making Gans
The three key Gans needed are:
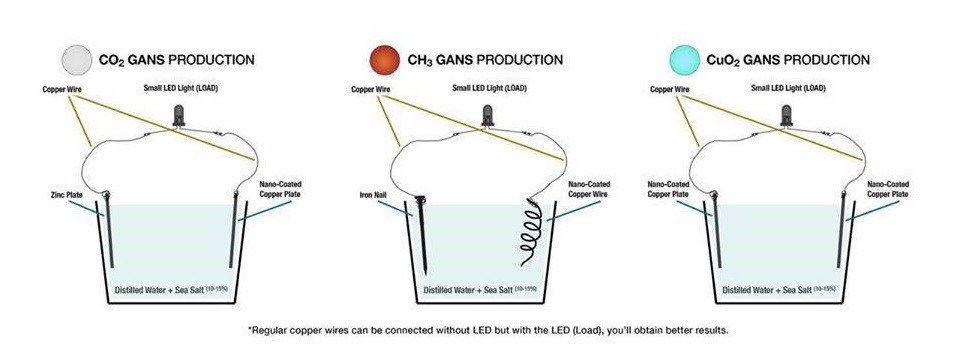
CO2/ZnO, Zinc Gans, further referred to as White Gans for simplicity.
– The procedure to make White Gans is a simple process. You connect a Nano Coated Copper piece and Zinc piece together with normal copper wire. The pieces of metal are placed on opposing ends of a bucket and salt water mixture is added. Leave it overnight to go through the process.
– The salt water mixture can be made from coarse sea salt or Himalayan salt. It is recommended to use 15 to 20% salt water content. One part salt, 5 parts water. If you reside in the coastal areas then sea water could be used because of the ideal salt content. But be aware that the sea water’s salt content differs from one location to another.
Note: When making Gans with corrugated zinc you should monitor the process to ensure that only CO2 Gans is made. It’s advised to let some white Gans form and then to stop the process when the metal becomes too exposed. If the colour of the Gans change you are tapping into the metal inside the corrugated zinc which will give you a different metallic oxide combination Gans. For health plasma applications its recommended to use pure zinc. Plasma Tools
CH3, Iron Gans, further referred to as Brown Gans because of its rusty colour.
– The procedure to make Brown Gans. Connect a Nano Coated Copper piece and a piece of Iron together with a normal piece of copper wire. Place them at opposing sides of a bucket and add your salt water mixture to the bucket. Leave it overnight to go through the process.
CuO, Copper Gans, and referred to here as Blue Gans.
– To make Blue Gans. Connect a piece of copper (Nano Coated) with another piece of copper with a normal copper wire. Place them inside a bucket and add your salt water mixture to the bucket. Leave it overnight to go through the process.
Note: It is advised to have you metal pieces about 10cm from each other.
To increase Gans production you could use a fish tank pump to blow air into the bottom of your bucket. This increases oxygen levels helping the process on through oxidation.
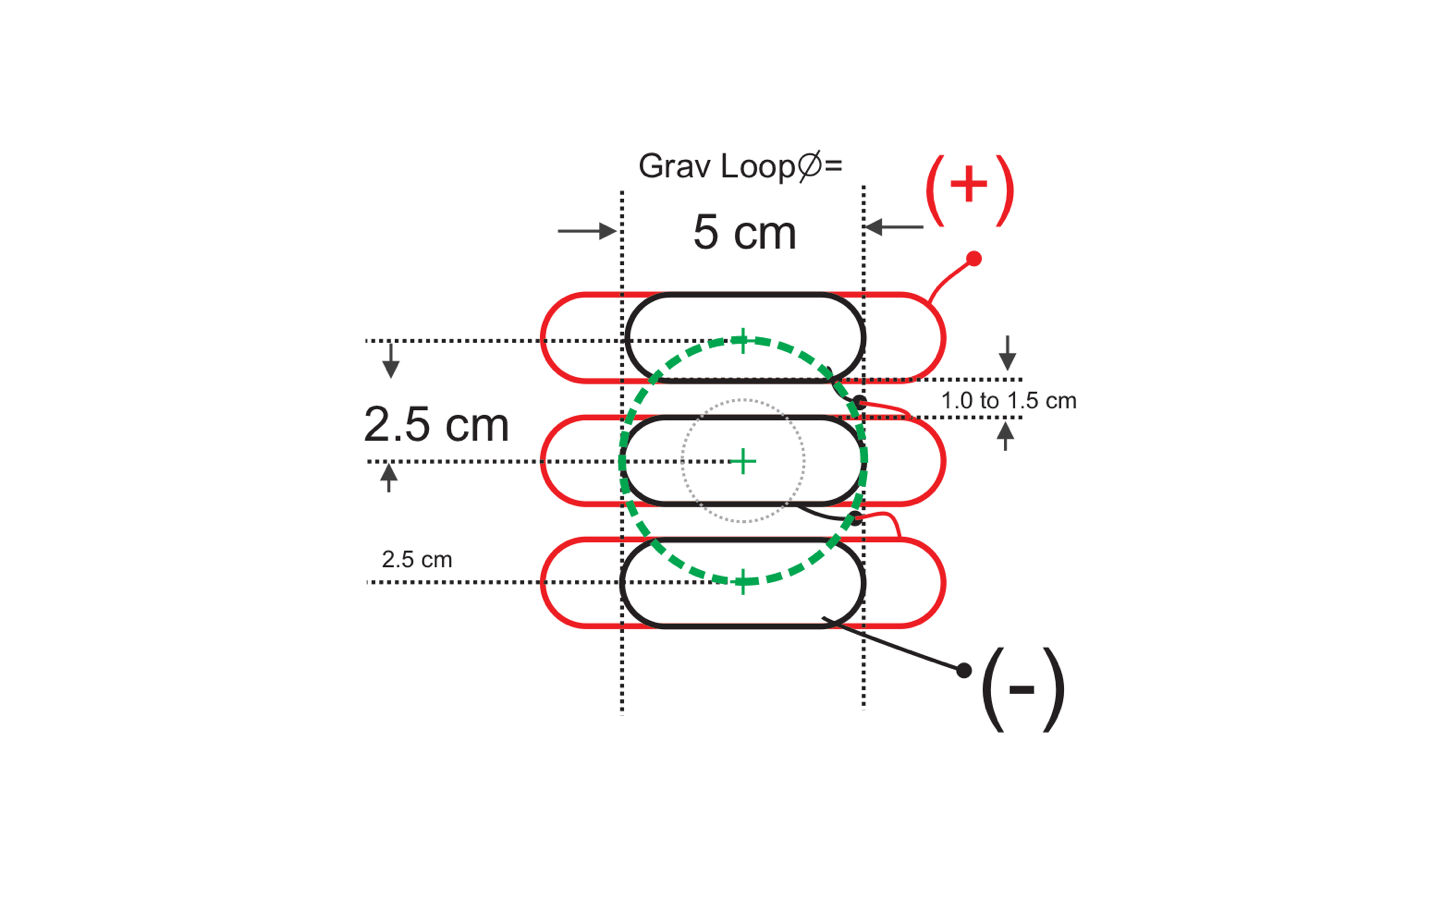
Making the Coils
If you don’t have bare copper cable you’ll have to strip the cable.
Please wear gloves when handling bare copper wire to avoid greasy fingers on the wires.
The best way to wind your coils is to use sized rods.
*Note that here you can adjust the rod sizes if your wire is slightly thicker or thinner. It is ideal to have .5mm gap so the inner coil slides into the outer coil
1x 10 mm rod 80 cm long (Adjust to ensure coils fit into each other) 1x 6 mm rod 80 cm long (Same applies as above)
Take two pieces of wood and make two holes inside of each for your rods to fit through.
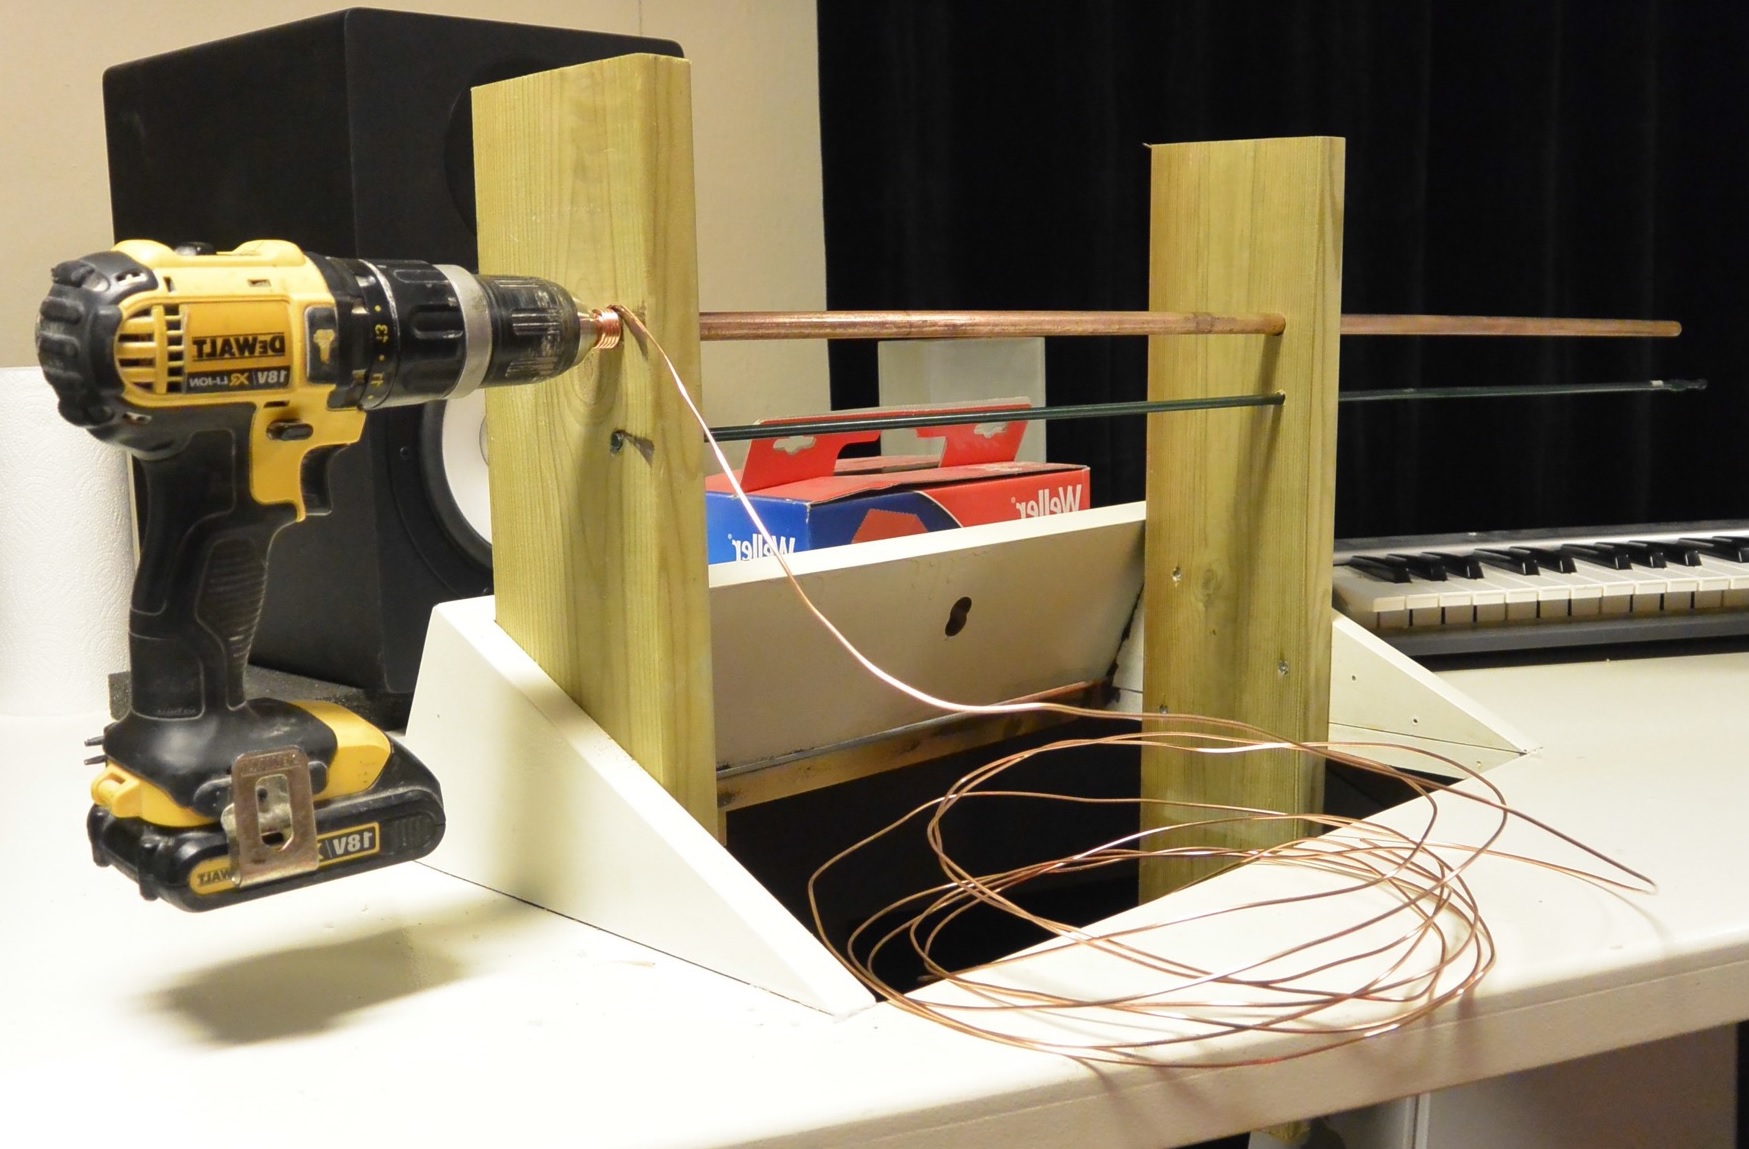
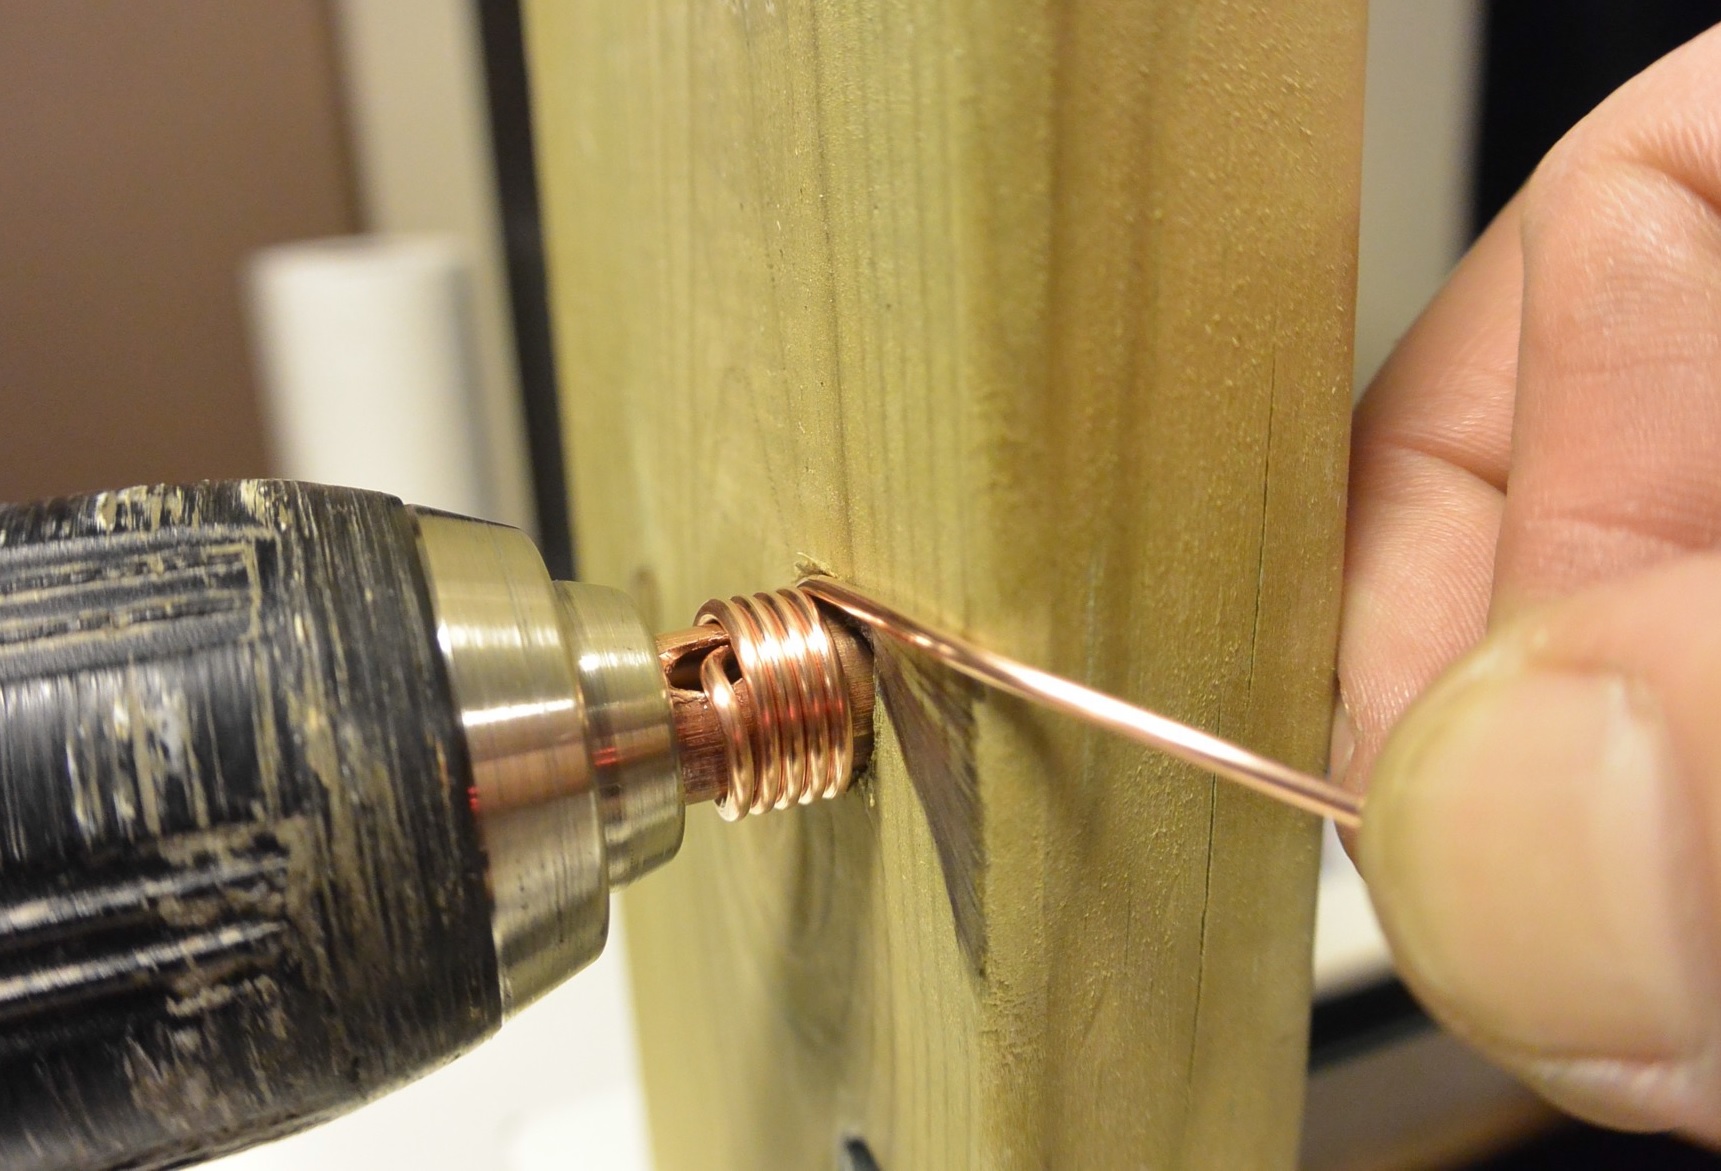
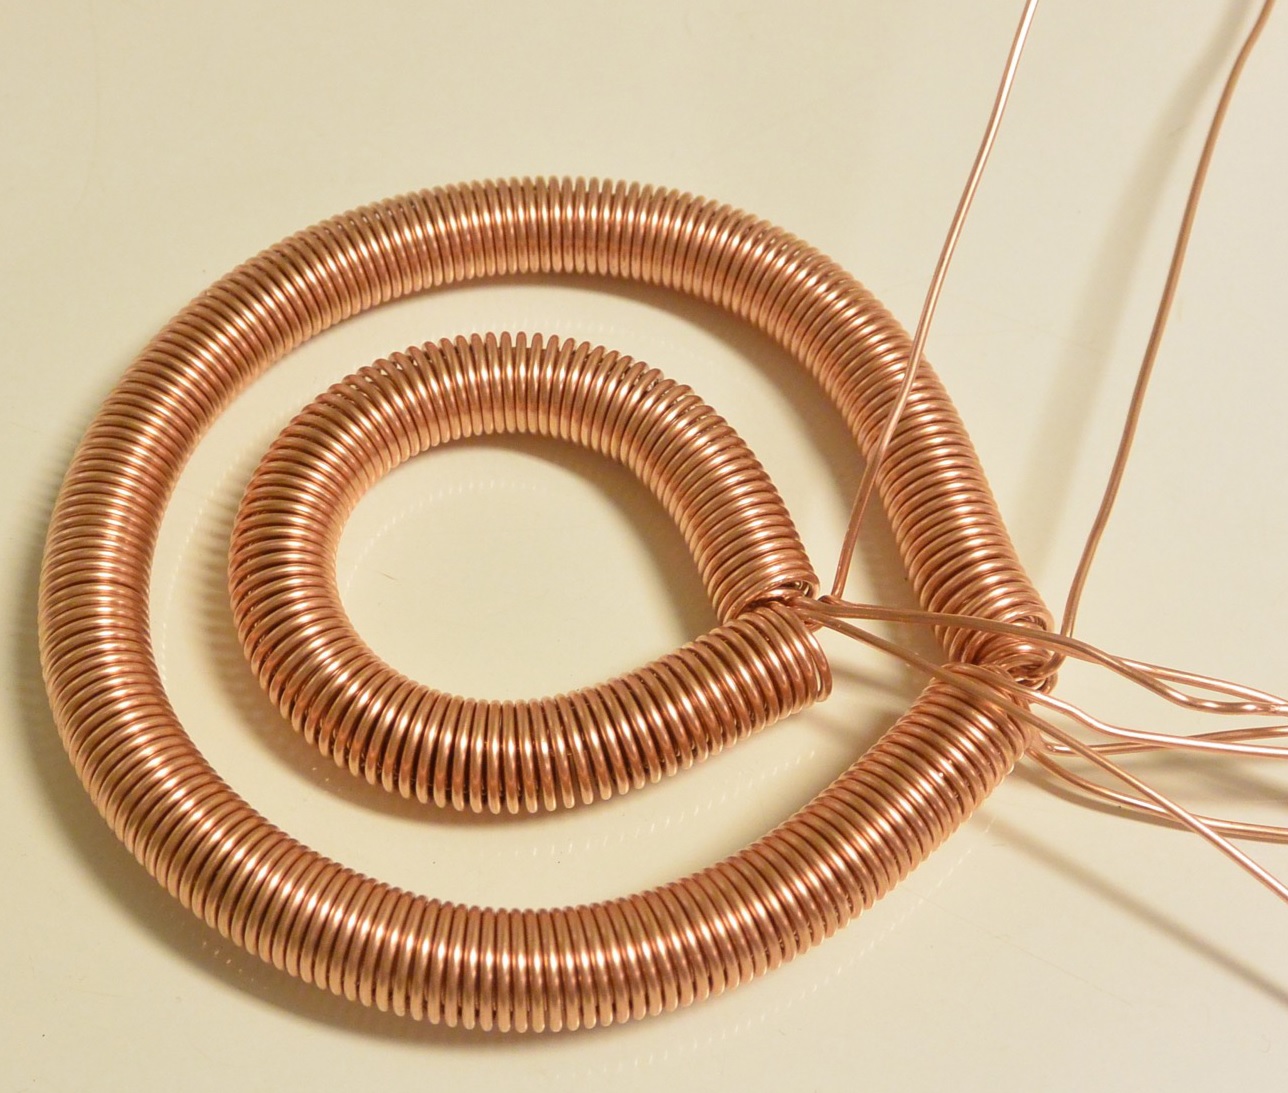
Start by making the outer coils. Drill a small hole in the rod where the cable can be fixed. Your hand drill should be set on counter-clockwise. The same as when you are screwing a screw out. See picture. Leave 15 cm of thread at either side of each outer coil.
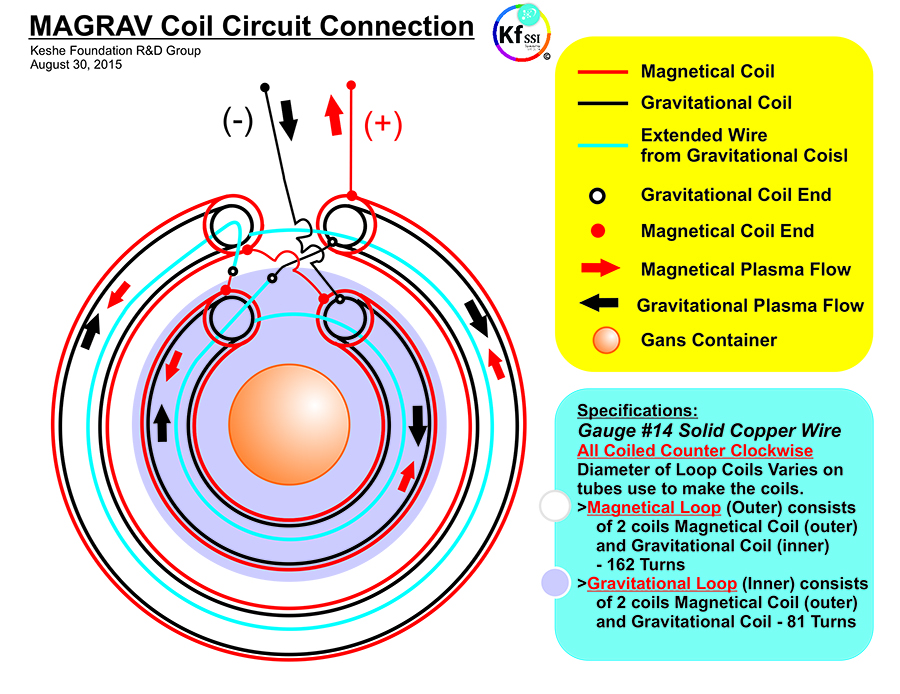
It is recommended to have 144 turns (162 turns is also an option if you use thicker cable) for your outer coils and 81 turns for the inner coils. If you want to adjust the coils to be bigger or smaller than keep in mind that the number of turns together should always add up to 9 (E.g. 144 = 1 + 4 + 4 = 9/ 81 = 8+1 = 9).
The inner coils should have 15 cm thread on one side and 30 cm thread on the other. As opposed to the outer coils which is 15 cm on both ends.
All loose ends should be looped to form an eye. Bend the wire back towards itself without touching the wire. After completion you should have the following coils:
Outer Coils
3x 144 turns made with 10 mm rod. 15cm thread on both sides. 3x 144 turns made with 6 mm rod. 15cm thread on both sides.
Place the thinner coil into the larger one to form one piece. Picture below.

Inner Coil
3x 81 turns made with 10 mm rod. 15 cm thread on one side, 30 cm on the other. 3x 81 turns made with 6 mm rod. 15 cm thread on one side, 30 cm on the other. Again place the thinner coil into the larger one to form one piece.
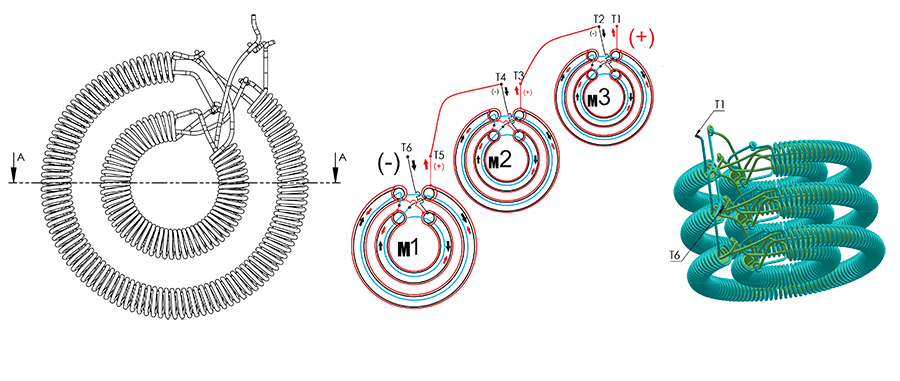
Single Stack
A single stack unit as depicted below consists of 4 coils. 2 inner coils and 2 outer coils.
These are stacked to form the 3 stack unit.
Nano Coating the Coils
It is up to the individual to choose the coating process. Some use both processes to Nano coat.
Warning: Caustic Soda is dangerous and it is recommended to always wear gloves, glasses. Be careful not to inhale the fumes, a mask should be worn. Ensure that your plastic container is made of strong quality plastic, the process is heat intensive and your container should be strong enough to withstand the heat.
Nano coating with caustic – Spread an even layer of caustic soda at the bottom of a plastic container, ensure that the whole are is covered. It’s optional to add some tin foil pieces and a few plastic bottle “necks” (cut from Coca Cola bottles).Add galvanized wire mesh to your container, with a distance of 5-6 cm from the bottom. This is to suspend your materials (copper coils, wires and pieces) and should be strong enough to carry the load without sinking.
Suspend all the materials in your container, put the lid at an angle and pour boiling water down until it the caustic is covered. The coils must not have contact with the water surface during the nano treatment. Quickly close the lid and place something heavy on top. Leave it for 24 hours.
Discharge the coils and repeat the process 3 times. To discharge use a volt meter touch either side of the coils, allowing the meter to stop counting volts.
Nano coating by fire. Hang your coils at a comfortable height so you can burn the surface. It is important to keep the flame moving and use care not to allow the coils to turn red-hot. If the coil turns red-hot, remove the flame and allow the area to cool before reapplying the flame. If your copper coils make rainbow colours then it’s not enough heat. If it becomes red-hot it is too much heat and it will result in unwanted flaking. Allow your coils to cool completely between coats.
Treating the individual stacks with Gans
Each individual stack is treated with its own field by laying it in the corresponding Gans. Take a bucket, insert the washed Gans at the bottom, and place your coils in the liquid. Let it rest there absorbing the fields into the Nano Coating. Take it out let it dry. It is not necessary to have Gans stick to the coils unless preferred. The Nano Coated coils absorb the fields and it stays on the coil even when the coils are removed to dry.
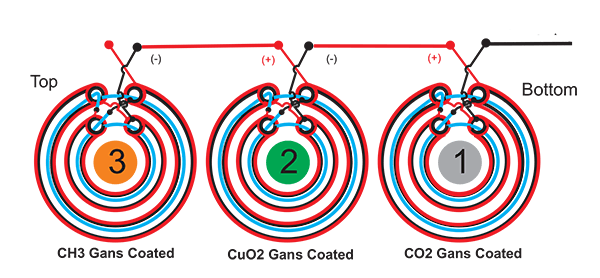
The Bottom Stack – White Gans (Zinc Gans – CO2/ZnO) The Middle Stack – Blue Gans (Copper Gans – CuO) The Top Stack – Brown Gans (Iron Gans – CH3)
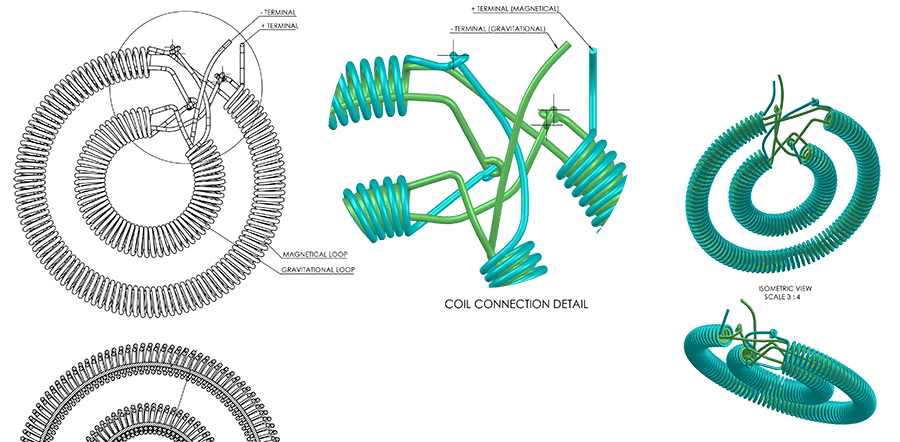
Wiring your Stacks
Preparing the Gans Balls
It is recommended to use a 30 mm empty plastic ball. The size of a Ping-Pong ball is 40 mm. We use and recommend Ping-Pong balls because of the availability.
You need to fill 3 ping balls, one for each stack. Again the liquid that goes into the balls are the same as the liquid you treated your wires with.
The Bottom Stack – White Gans (CO2) – 5 ml Pure Gans topped up with Water of the same Gans The Middle Stack – Blue Gans (CuO) – 5 ml Pure Gans topped up with Water of the same Gans The Top Stack – Brown Gans (CH3) – 5 ml Pure Gans topped up with Water of the same Gans
After you have inserted the corresponding liquids you close the hole with adhesive such as super glue.
Making the Capacitors
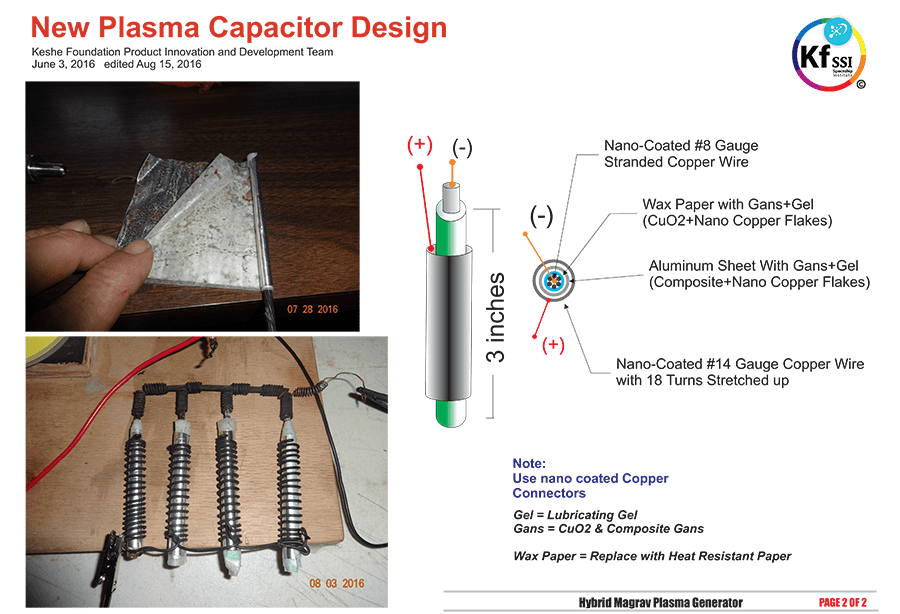
Construct you device
Wire you device
Test your device
The best way to test your device is to check for resistance on each individual component on your Magrav.
Grid Connection
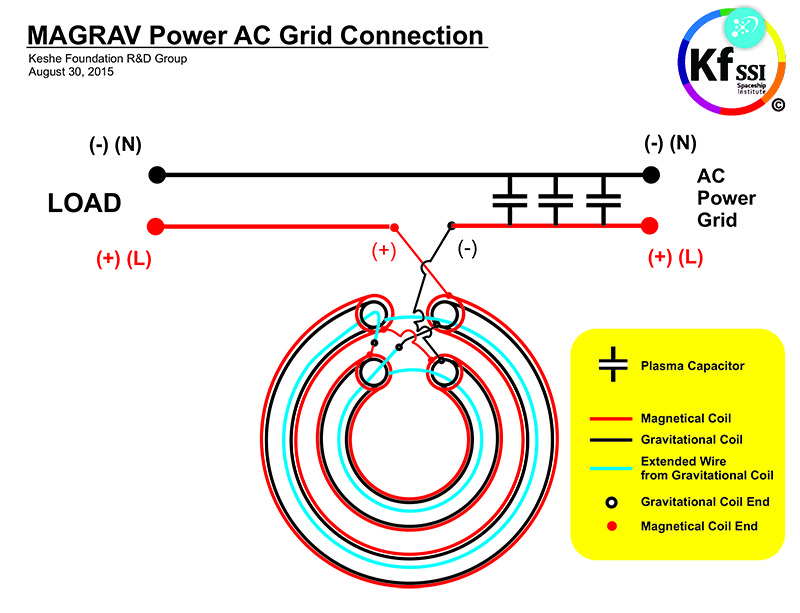
You could add more capacitors sets load side or grid side. Group capacitors in sets of four or more.
One thought on “Building a Magrav”
Comments are closed.
É um prazer participar e se possível,ser aluno;sou eletricista e tenho acompanhado essa pesquisa a três anos,tenho em meu quarto,alguns reatores em processo de aperfeiçoamento,tenho muito que aprender,se eu tiver uma oportunidade,estarei apresentando algumas pesquisas keshe, obrigadado.